OO-Pre Lecture
01 概述
只有public且提供了main的类,才能使用命令行
Java程序的类型
基础类型
整型: int, short, long, byte, BigInteger(构造类型class)
布尔型: boolean
浮点型: float, double
字符型: char
Note: 字符串不在其中
构造类型
类 class
接口 interface
| public interface Showable {
void print();
}
|
枚举 enum
传递参数
基础数据类型为值传递,引用数据类型为引用传递(传递的是堆内存中的地址,形参改变,实参也改变)
ps. Object
是一个类,理解成万能指针,任意对象都能用Object变量指向它。
Object obj = new MyClass(...)
但之后 obj.<method of MyClass> 报错,无法使用 MyClass 内的方法
分享
设计思路(先想再写),自己造数据找bug(测试)
我们强烈推荐同学们按照【工具链教程】进行环境和工具的配置与安装,并最好能够以简单的demo跑通他们,正确的环境和良好的工具将让你的课程学习事半功倍。如果在这个过程中遇到难以解决的问题,欢迎在群里讨论交流。工具链教程链接:https://bhpan.buaa.edu.cn/link/AAE87220770022402E9CAF5FE32389A7D1。
02 测试与容器
主类
拥有 main method 的类是主类
-
一般不设置 attribute (属性)
-
main 一般不做具体业务处理
private方法实例化
| public class Secret {
private Secrete
}
|
构造方法为 private 的类如何实例化???
参数传递
值与引用:Java 采用值传递
- 基础类型直接值传递
- 引用类型传递引用本身 (对象的地址)
"指针":class, enum, interface, 数组变量
JUnit|简介
使用JUnit编写单元测试的好处: 我们可以非常简单地组织测试代码,并随时运行它们,JUnit就会给出成功的测试和失败的测试,还可以生成测试报告,不仅包含测试的成功率,还可以统计测试的代码覆盖率,即被测试的代码本身有多少经过了测试。对于高质量的代码来说,测试覆盖率 (以语句为单位) 应该在80%以上。
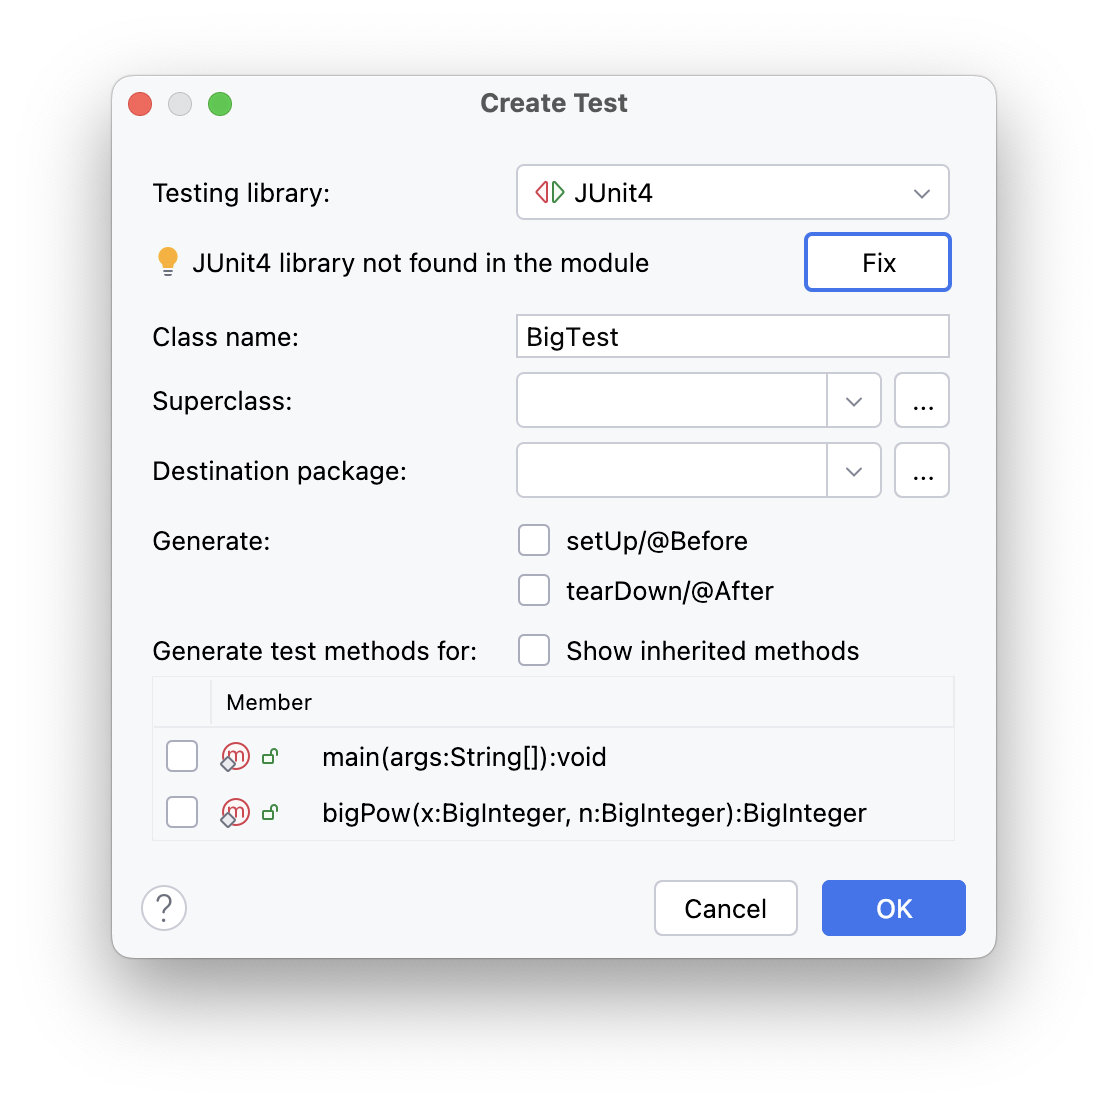
JUnit|使用
在 project 下新建 Test 文件夹,标记该文件夹: Mark Directory as > Test Sources Root
任一行 右键 > Go To > Test > Create New Test
选择 JUnit4 (课程要求),并点击 Fix
一路确定,出现:
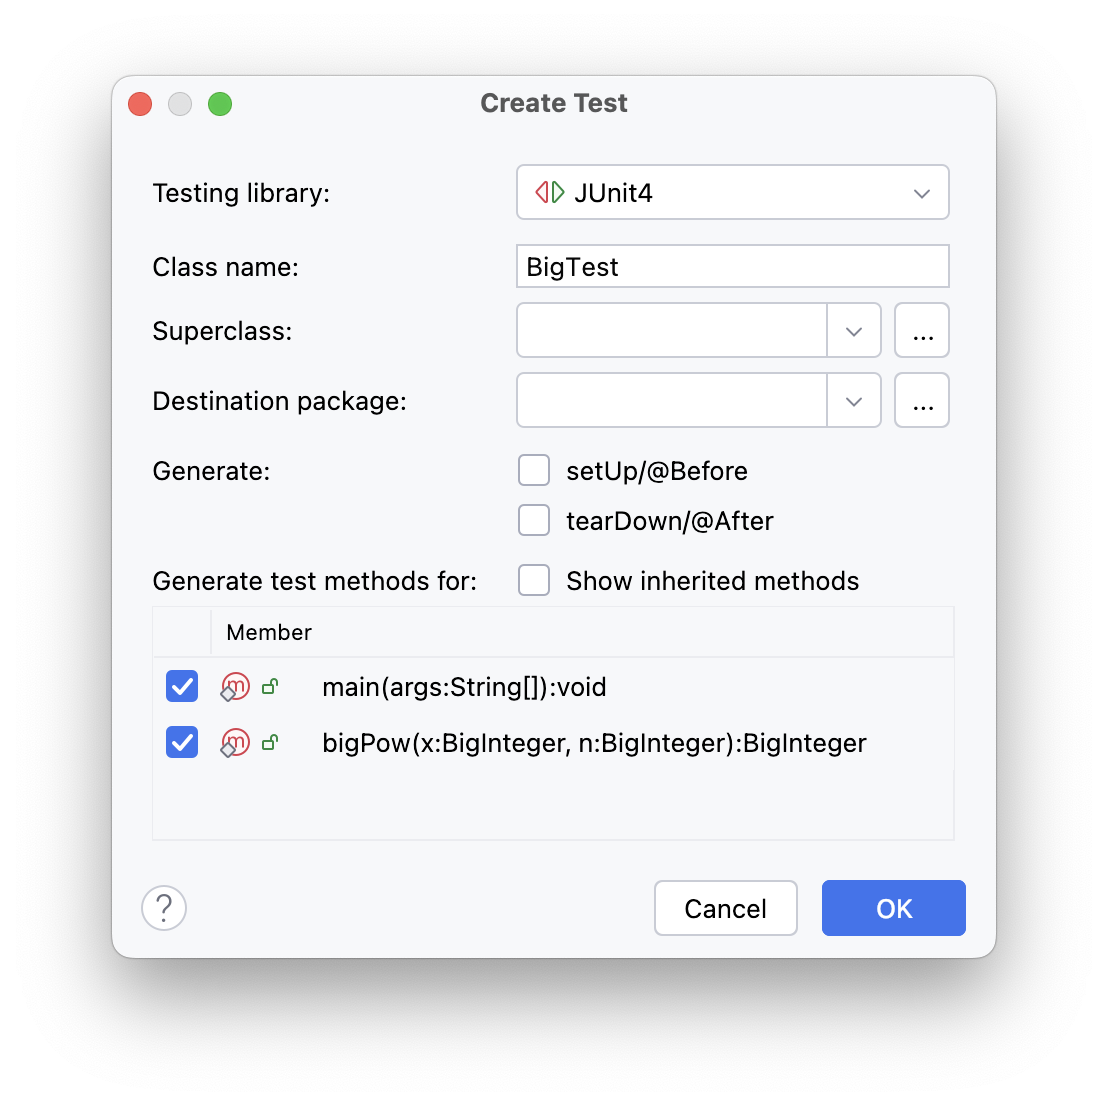
勾选Member框,表示对这些方法进行测试
测试文件生成成功

通过三角形运行
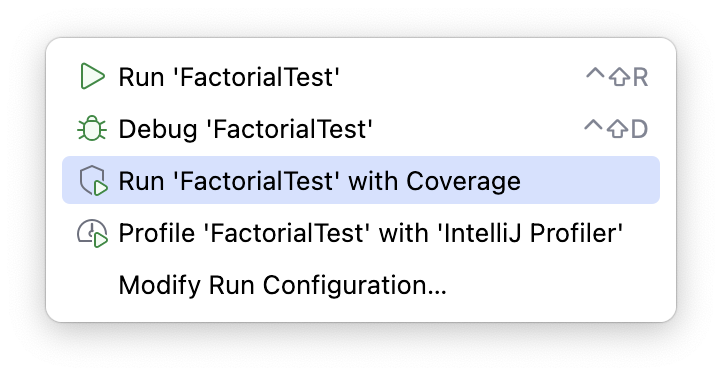
Run 'xxx' with Coverage 会显示神奇的统计数据
run的结果:)

JUnit|修改import部分
课程组要求:
- 添加
import org.junit.Test
- 保证每个注释是
@Test

JUnit|编写测试文件
| import static org.junit.Assert.*; // 导入 JUnit 断言类
assertEquals(a, b);
assertTrue(condition); // 检查条件是否为真
assertFalse(condition);
assertNotNull(object);
assertNull(object);
assertNotSame(expected, actual); // 检查两个相关对象是否不指向同一个对象
assertSame(expected, actual); // 检查两个相关对象是否指向同一个对象
assertArrayEquals(expectedArray, resultArray); // 检查两个数组是否相等
|
JUnit|使用Fixture
| public class Calculator {
private long n = 0;
public long add(long x) {
n = n + x;
return n;
}
public long sub(long x) {
n = n - x;
return n;
}
}
|
测试的时候,我们要先初始化对象,通过 @BeforeEach 来初始化,通过 @AfterEach 来清理资源,它们会在运行每个@Test方法前后自动运行:
| public class CalculatorTest {
Calculator calculator;
@BeforeEach
public void setUp() {
this.calculator = new Calculator();
}
@AfterEach
public void tearDown() {
this.calculator = null;
}
@Test
void testAdd() {
assertEquals(100, this.calculator.add(100));
assertEquals(150, this.calculator.add(50));
assertEquals(130, this.calculator.add(-20));
}
@Test
void testSub() {
assertEquals(-100, this.calculator.sub(100));
assertEquals(-150, this.calculator.sub(50));
assertEquals(-130, this.calculator.sub(-20));
}
}
|
但是好像 JUnit 4 无法使用
小结:
- 对于实例变量,在
@BeforeEach 中初始化,在 @AfterEach 中清理,它们在各个 @Test 方法中互不影响,因为是不同的实例;
- 对于静态变量,在
@BeforeAll 中初始化,在 @AfterAll 中清理,它们在各个 @Test 方法中均是唯一实例,会影响各个 @Test 方法
大多数情况下,使用 @BeforeEach 和 @AfterEach 就足够了。只有某些测试资源初始化耗费时间太长,以至于我们不得不尽量“复用”时才会用到 @BeforeAll 和 @AfterAll
JUnit|异常测试
| public class Factorial {
public static long factorial(int n) {
if (n < 0) {
throw new IllegalArgumentException();
}
long fact = 1;
for (int i = 1; i <= n; i++) {
fact = fact * i;
}
return fact;
}
}
|
编写一个 @Test 方法专门测试异常:
| @Test
void testNegative() {
assertThrows(IllegalArgumentException.class, new Executable() {
@Override
public void execute() throws Throwable {
Factorial.fact(-1);
}
});
}
|
JUnit|条件测试
不让某些测试方法运行,加上 Disabled 注释:
| @Disabled
@Test
void testBug101() {
// 这个测试不会运行
}
|
在不同操作系统下测试代码:
| public class Config {
public String getConfigFile(String filename) {
String os = System.getProperty("os.name").toLowerCase();
if (os.contains("win")) {
return "C:\\" + filename;
}
if (os.contains("mac") || os.contains("linux") || os.contains("unix")) {
return "/usr/local/" + filename;
}
throw new UnsupportedOperationException();
}
}
|
只能在Windows上测试:
| @Test
@EnabledOnOs(OS.WINDOWS)
void testWindows() {
assertEquals("C:\\test.ini", config.getConfigFile("test.ini"));
}
@Test
@EnabledOnOs({ OS.LINUX, OS.MAC })
void testLinuxAndMac() {
assertEquals("/usr/local/test.cfg", config.getConfigFile("test.cfg"));
}
|
不在Windows平台执行的测试:
| @Test
@DisabledOnOs(OS.WINDOWS)
void testOnNonWindowsOs() {
// TODO: this test is disabled on windows
}
|
只能在Java 9或更高版本执行的测试:
| @Test
@DisabledOnJre(JRE.JAVA_8)
void testOnJava9OrAbove() {
// TODO: this test is disabled on java 8
}
|
只能在64位操作系统上执行的测试:
| @Test
@EnabledIfSystemProperty(named = "os.arch", matches = ".*64.*")
void testOnlyOn64bitSystem() {
// TODO: this test is only run on 64 bit system
}
|
需要传入环境变量 DEBUG=true 才能执行的测试:
| @Test
@EnabledIfEnvironmentVariable(named = "DEBUG", matches = "true")
void testOnlyOnDebugMode() {
// TODO: this test is only run on DEBUG=true
}
|
JUnit|参数化测试
@ParameterizedTest
假设我们想对 Math.abs() 进行测试,先用一组正数进行测试:
| @ParameterizedTest
@ValueSource(ints = { 0, 1, 5, 100 })
void testAbs(int x) {
assertEquals(x, Math.abs(x));
}
|
再用一组负数:
| @ParameterizedTest
@ValueSource(ints = { -1, -5, -100 })
void testAbsNegative(int x) {
assertEquals(-x, Math.abs(x));
}
|
假设我们自己编写了一个 StringUtils.capitalize() 方法,它会把字符串的第一个字母变为大写,后续字母变为小写。用参数化测试的方法来测试,不但要给出输入,还要给出预期输出,测试方法至少需要接收两个参数:
@MethodSource 方法传参:
| @ParameterizedTest
@MethodSource
void testCapitalize(String input, String result) {
assertEquals(result, StringUtils.capitalize(input));
}
static List<Arguments> testCapitalize() {
return List.of( // arguments:
Arguments.of("abc", "Abc"), //
Arguments.of("APPLE", "Apple"), //
Arguments.of("gooD", "Good"));
}
|
@CsvSource 方法传参:
| @ParameterizedTest
@CsvSource({ "abc, Abc", "APPLE, Apple", "gooD, Good" })
void testCapitalize(String input, String result) {
assertEquals(result, StringUtils.capitalize(input));
}
|
还可以设置独立的CSV文件,放到 test 目录下:
| @ParameterizedTest
@CsvFileSource(resources = { "/test-capitalize.csv" })
void testCapitalizeUsingCsvFile(String input, String result) {
assertEquals(result, StringUtils.capitalize(input));
}
|
JUnit|总结
单元测试应该关注对象的行为,而不是其内部状态。应该测试该对象的公开方法,看看它们是否按预期执行,至于私有字段的值,应该通过公开方法的输出或副作用来间接验证。
容器介绍
容器中的元素实际上是对象,即必须是 Boolean Short Integer Long Character Float Double
例子:
| ArrayList<Integer> li = new ArrayList<>(); // 存放整数元素
|
常用容器: ArrayList HashMap TreeMap HashSet TreeSet
ArrayList
更多用法详解 菜鸟教程|ArrayList
动态数组
| import java.util.ArrayList; // 引入 ArrayList 类
public class ArrayListSample {
public void sample() {
/* 1. 创建ArrayList */
/* ArrayList<ClassName> ArrayName = new ArrayList<> */
ArrayList<Bottle> bottles = new ArrayList<>();
Bottle bottle1 = new Bottle(/*parameters*/);
Bottle bottle2 = new Bottle(/*parameters*/);
/* 2. 向ArrayList内加入一个元素(此外, 还可以向任意位置插入元素, 在add方法中新增参数即可) */
bottles.add(bottle1);
bottles.add(bottle2);
/* 3. 访问ArrayList中下标为i的元素 */
/* 数组名ArrayName.get(i) */
Bottle bottle = bottles.get(0); // == bottle1
/* 4. 判断元素是否在容器内 */
if (bottles.contains(bottle)) { // true
System.out.println("We have such a bottle!");
}
/* 5. ArrayList大小 */
/* 数组名ArrayName.size() */
int size = bottles.size();
/* 6. 遍历ArrayList中的所有元素 */
for (Bottle item : bottles) {
System.out.println(item.getName()); // getName方法是Bottle类中用于获取其name属性的方法
}
for (int i = 0; i < bottles.size(); i++) {
System.out.println(bottles.get(i).getName());
}
/* 7. 删除一个元素 */
/* 数组名ArrayName.remove(对象名) */
bottles.remove(bottle1);
/* 数组名ArrayName.remove(i) */
bottles.remove(0); // 删除了bottle2? 删除后立刻更新下标?
}
}
|
final 修饰 ArrayList ✅
| private final ArrayList<Bottle> bottles = new ArrayList<>();
|
According to NPE:
This means that you cannot rebind the variable to point to a different collection instance
I still can add to ArrayList new elements, remove elements and update it
LinkedList
菜鸟教程
双向链表
| import java.util.LinkedList;
public class LinkedListEg {
public static void main(String[] args) {
LinkedList<String> sites = new LinkedList<>();
sites.add("Google");
sites.add("Runoob");
sites.add("YC");
System.out.println(sites); // [Google, Runoob, YC]
/* 在列表结尾添加元素 */
sites.addLast("Apple");
/* 移除链表开头元素 */
sites.removeFirst(); // [Runoob, YC, Apple]
/* 移除尾部元素 */
sites.removeLast(); // [Runoob, YC]
/* 获取开头元素 */
System.out.println(sites.getFirst()); // Runoob
/* 迭代 */
for (int size = sites.size(), i = 0; i < size; i++) {
System.out.println(sites.get(i));
}
/* for-each迭代 */
for (String site : sites) {
System.out.println(site);
}
}
}
|
HashMap
更多用法详解
HashMap 存储的是键值映射,key-value
key应该选择不变量,常常是 String 型(是不能改变的)
| /* HashMap 类位于 java.util 包中,使用前需要引入它,语法格式如下:*/
import java.util.HashMap; // 引入 HashMap 类
public class HashMapSample {
public void sample () {
/* 1. 创建HashMap */
/* HashMap<引用类型Key,引用类型Value> 哈希表名mapName = new HashMap<> */
HashMap<Integer, Bottle> bottles = new HashMap<>(); // bottle's id => bottle
Bottle bottle1 = new Bottle(/*parameters*/);
Bottle bottle2 = new Bottle(/*parameters*/);
/* 2. 向HashMap内加入一个元素 */
/* 数组名mapName.put(引用对象key,引用对象value) */
bottles.put(12345,bottle1);
bottles.put(bottle2.getId(),bottle2);
/* 3. 访问HashMap中key值对应的value */
/* 哈希表名mapName.get(key) */
Bottle bottle = bottles.get(12345); // == bottle1
/* 4. 检查HashMap中是否存在指定的 key 对应的映射关系。 */
/* mapName.containsKey(key) */
if (bottles.containsKey(12345)) { // true
System.out.println("We have such a bottle!");
}
/* 5. 检查HashMap中是否存在指定的 value 对应的映射关系。*/
/* mapName.containsValue(value) */
if (bottles.containsValue(bottle2)) {
System.out.println("We have such a bottle!");
}
/* 6. HashMap大小, 即键值对数目 */
/* 数组名mapName.size() */
int size = bottles.size();
/* 7. 遍历HashMap中的所有元素 */
for (int key : bottles.keySet()) { // keySet可以获取HashMap容器中所有 key 组成的对象集合
System.out.println("bottle's function is " + bottles.get(key).getName());
}
for (Bottle value : bottles.values()) { // values可以获取HashMap容器中所有 value 组成的对象集合
System.out.println("bottle's function is " + value.getName());
}
/* 8. 删除一个映射关系 */
/* mapName.remove(key) */
// bottles.containsKey(12345) == true
bottles.remove(12345); // true
// bottles.containsKey(12345) == false
/* 9. 删除一个键值对
/* mapName.remove(key, value) 键值对能被删除的条件为:当且仅当HashMap存在该 key-value 键值*/
// bottles.containsKey(bottle2.getid()) == true
bottles.remove(bottle2.getid(), bottle1); // false
// bottles.containsKey(bottle2.getid()) == true 此处仍然为真!
bottles.remove(bottle2.getid(), bottle2); // true
// bottles.containsKey(bottle2.getid()) == false;
}
}
|
迭代:获取 key,用 keySet() method。获取 value,用 values() method
| for (Integer i : Sites.keySet()) {
System.out.println("key: " + i + ", value: " + Sites.get(i));
}
for (String value : Sites.values()) {
System.out.print(value + " ");
}
|
HashSet
菜鸟教程|HashSet
Set 不能有重复元素,重复的合并
Queue
LinkedList 类实现了 Queue 接口
| import java.util.Queue;
import java.util.LinkedList;
public class QueueEg {
public static void main(String[] args) {
Queue<String> queue = new LinkedList<>();
// 添加元素
queue.offer("a");
queue.offer("b");
queue.offer("c");
queue.offer("d");
// 遍历
for (String q : queue) {
System.out.println(q);
}
System.out.println("===");
System.out.println(queue.poll()); // 返回第一个元素,并移出队列
System.out.println(queue.element()); // 队中第一个元素
System.out.println(queue.peek()); // 队中第一个元素
}
}
|
队为空时,element() 抛出异常,peek() 返回 null
03 继承与接口
继承的含义 (inheritance)
继承意味着基于已有的类建立新的类。Subclass 继承 Superclass 后,就拥有父类的 fields 和 methods,同时可以在子类添加新的 fields 和 methods

所有的类都是继承于 java.lang.Object,当一个类没有继承的两个关键字,则默认继承 Object
「Thinking」继承可以想象为复制粘贴了父类的代码块?
extends
类的继承格式:
| class BaseClass {}
class DerivedClass extends BaseClass {}
|
super
super.<attribute> 和 super.<method>() 可以调用父类的属性和方法
例子:
| public class Bicycle {
// the Bicycle class has two fields
public int gear;
public int speed;
// the Bicycle class has one constructor
public Bicycle(int gear, int speed) {
this.gear = gear;
this.speed = speed;
}
// the Bicycle class has three methods
public void applyBrake(int decrement) { speed -= decrement; }
public void speedUp(int increment) { speed += increment; }
// toString() method to print info of Bicycle
public String toString() {
return ("No of gears are " + gear + "\n" + "speed of bicycle is " + speed);
}
}
|
| public class MountainBike extends Bicycle {
// 新增 field
public int seatHeight;
// construcor, 新增加了参数
public MountainBike(int gear, int speed, int startHeight) {
super(gear, speed); // 先 invoke 父类的 constructor
seatHeight = startHeight;
}
// 新增 method
public void setHeight(int newValue) { seatHeight = newValue; }
@Override
public String toString() {
return (super.toString() + "\nseat height is " + seatHeight); // invoke 父类的 toString
}
}
|

instanceof
| class SolarSystem {
}
class Earth extends SolarSystem {
}
class Mars extends SolarSystem {
}
public class Moon extends Earth {
public static void main(String args[]) {
SolarSystem s = new SolarSystem();
Earth e = new Earth();
SolarSystem m = new Mars(); // invoke by SolarSystem, point to Mars
System.out.println(e instanceof SolarSystem); // true: is-a relationship
System.out.println(m instanceof Mars); // true!!!
}
}
|
我们使用 instanceof 的目的,是希望如果结果为 true 的时候能进行类型转换。
「Thinking」那就假设发生了类型转换,再看是不是合理,就能判断 instanceof 的结果了
private
子类不能直接访问父类的 private field
「Thinking」但我觉得是"继承"了的,因为 constructor 能用,感觉很像其他类不能访问某类中的private。
对象与引用
对象是通过 new 产生的实例,引用是在程序中声明的变量
父类引用可以指向子类对象
| Bottle bottle = new HpBottle(balabala);
|
我们可以不用单独管理每一个子类对象,而是只管理他们的父类对象。例如我们可以把 Son, Daughter 等子类都加入到 ArrayList<Father> 中,或者 put 到 HashMap<String, Father> 中
according to Keshi:
什么类型的引用决定了能调用哪些方法/访问哪些变量:
首先,实例化的子类对象具备父类继承+子类专属。若是Father类型的引用,则只能访问/调用子类中父类继承的内容。如果某一父类方法被子类重写,则在调用时会调用重写后的方法。
多态:对象的声明必须是父类,实例化的对象是子类,这样才能实现多态。多态的原理是当方法被调用时,只有位于对象继承链末端的方法实现会被调用。
子类不会继承父类的 private 属性和方法
继承的特点小结
constructors 不属于属性或方法,所以并未被子类继承
子类可以用自己的方式实现父类的方法 ⬇️ override
方法重写 (override)
方法名称、参数列表和返回类型必须完全一致
推荐 @override 注解
重写方法的 visibility 范围必须大于等于父类方法
接口的含义 (interface)
接口是方法的集合,a blueprint of a behavior. A Java interface contains static constants and abstract methods.
一个类通过 implement 接口,来继承接口的抽象方法
class can implement multiple interfaces

interface
| public interface NameOfInterface {
// declare constant fields
// declare methods that abstract by default
public static final <数据类型> <常量名称> = <数据值>;
public <返回值> <nameOfFunction> (<args..>);
}
|
all the methods in an interface are declared with an empty body and are public and all fields are public, static, and final by default
| public interface In1 {
// public, static and final
final int a = 10;
// public and abstract
public void display();
}
|
implements
要求实现接口中定义的所有方法,@Override 表示对抽象方法的重写(即提供实现)
| public class TestClass implements In1 {
// Implementing the capabilities of interface.
public void display() {
System.out.println("Geek");
}
public static void main(String[] args) {
TestClass t = new TestClass();
t.display(); // output: Geek
System.out.println(t.a); // output: 10
}
}
|
Vehicles like bicycles, cars, etc, they have common functionalities. So we make an interface and put all these common functionalities. And let bicycle, car, etc implement all these functionalities in their own class in their own way.
| public interface Vehicle {
void changeGear(int a); // abstract methods
void speedUp(int a);
void applyBrakes(int a);
}
|
| public class Bicycle implements Vehicle {
int speed;
int gear;
@Override
public void changeGear(int newGear) { gear = newGear; }
@Override
public void speedUp(int increment) { speed = speed + increment; }
@Override
public void applyBrakes(int decrement) { speed = speed - decrement; }
public void printStates() {
System.out.println("speed: " + speed + " gear: " + gear);
}
}
|
接口不能直接被实例化
| public interface Department {
public void sendIn(String origin);
public void sendOut(String target);
public void operation(Animal animal);
}
|
需要定义一个类实现接口 (即 implements... ),再实例化
| Department bath = new Bath();
|
接口的使用
接口(Interface)是与类处于同一层次的类型。任何类都可以实现一个接口,即实现了接口中所定义的所有方法。一旦实现了一个接口,就可以使用该接口类型来引用相应的对象。
according to goblinjuice
Interfaces can be used for many things. The most commons uses are polymorphism and dependency injection, where you can change the dependencies at run time. For example, suppose you have an Interface called Database which has one method called getField(...).
| public interface Database {
public void getField(String field);
}
|
Now suppose you have use two databases in your application depending on your client: MySQL and PostgreSQL. You will have two concrete classes:
| public class MySQL implements Database {
// mysql connection specific code
@Override
public void getField(String field) {
// retrieve value from MySQL
}
}
|
And...
| public class PostgreSQL implements Database {
// postgre connection specific code
@Override
public String getField(String field) {
// retrieve value from Postgre
}
}
|
Now depending on your client preference, you can instantiate a MySQL or PostgreSQL class in your main
| public static void main(String args[]) {
if (args[2].equals("mysql"))
Database db = new MySQL();
else
Database db = new PostgreSQL();
}
//now get the field
String foo = db.getField(); // 不同的实现
|
04 错误分析
输入指令处理
CommandUtil 需要访问容器?只暴露数据处理/业务处理方法,不暴露容器
设计 CommandUtil 接口,提供 command(String message) 方法,Manager 类管理 CommandUtil 对象
MainClass :
| import java.util.Scanner;
public class MainClass {
public static void main(String[] args) {
Scanner scanner = new Scanner(System.in);
Solver solver = new Solver(scanner);
solver.solve();
}
}
|
MainClass 只进行了读取,并未解析
Solver class:
| import java.util.Scanner;
public class Solver {
private final Scanner scanner;
public Solver(Scanner scanner) {
this.scanner = scanner;
}
public void solve() {
int t = scanner.nextInt(); // 选择操作
while (t-- != 0) {
int op = scanner.nextInt();
if (op == 1) {
addBook();
} else if (op == 2) {
addBook2Shelf();
}
// other circumstances
}
}
private void addBook() {
String name = scanner.next(); // 读详细信息
String magic = scanner.next();
Book book = new Book(name, magic);
books.add(book);
}
// other methods
}
|
空指针异常
null 对象不能引用访问对象成员
| String str = null;
int len = str.length(); // error
|
类型转换
| public class ClassCastExceptionEg {
public static void main(String[] args) {
Shape shape = new Circle();
Rectangle rec = (Rectangle)shape;
}
}
|

shape 是个指针,指向用 Circle 开辟的空间,不能转成平行的 Rectangle
更好的写法:
| // 判断两个点是不是在同一个位置
public boolean equals(Object o) {
if (o == null) return false;
if (o instanceof Point) { // 先用 instanceof 判断,再类型转换
Point other = (Point)o;
return (this.x == other.x) && (this.y == other.y);
}
else return false;
}
|
输入输出
next()
- 读取到有效字符后才可以结束输入
- 对输入有效字符之前遇到的空白,
next() 方法会自动将其去掉
- 只有输入有效字符后才将其后面输入的空白作为分隔符或者结束符
nextLine()
- 读到
\n 就停止读取,并且吸收回车(即读取指针会从下一个字符开始读)
next() nextInt() 等,都会读到非期望字符后停止,指向那个非期望字符,下一次读取从当前位置开始
clone
| Test ob1 = new Test();
Test ob2 = ob1;
|
= 让 ob1 和 ob2 指向同一片区域 (因为ob1存的是地址),要想实现拷贝需要 clone
<object>.clone() 默认是浅拷贝
浅拷贝:把A拷贝给B,B也拥有所有A的数据,其中A中invoke的对象指针复制给B,B也指向同一片区域(本来指针存的就是地址)
深拷贝:B也创建一个新的对象
容器:容器管理的是若干实例的引用,不是实例
字符串
字符串是不能修改的,每次 String newStr = str.replace(" ", "x"); 的话,会使用很多空间,容易触发强制回收
字符串对象,假设不通过 new 方法创造,它是被放在一个叫做“字符串常量池”的地方,和我们创建对象所用的堆区并不是在一起的
equals()
判断Map的key是否相等,应该使用 equals() 方法而不是 == 操作符
from 博客园|Java提高篇——equals()与hashCode()方法详解 :
Java 中的集合有两类—— List 和 Set。前者集合内的元素是有序的,元素可以重复;后者元素无序,但元素不可重复。在往 Set 中新增元素时,先用元素的 hashCode method,定位到它应该放置的物理位置上。如果这个位置上已经有元素了,就调用它的equals方法与新元素进行比较,相同的话就不存了,不相同就散列其它的地址
迭代器
菜鸟教程|Java Iterator
迭代器是一种用于遍历集合(如列表、集合和映射等)的接口。它提供了一种统一的方式来访问集合中的元素
next() ——返回迭代器的下一个元素,并将迭代器的指针移到下一个位置hasNext() ——用于判断集合中是否还有下一个元素可以访问remove() ——从集合中删除迭代器最后访问的元素
使用迭代器删除
遍历容器过程中使用迭代器
| Iterator<Dog>iterator= arrayList.iterator();
while (iterator.hasNext()){
Dog dog=iterator.next();
//....
}
|
如果边遍历边删除会出错
| ArrayList<Dog> arrayList = new ArrayList<>();
arrayList.add(new Dog("dog1"));
arrayList.add(new Dog("dog2"));
arrayList.add(new Dog("dog3"));
for (Dog dog : arrayList) {
arrayList.remove(dog);
}
|
用迭代器翻译过来,也会有相同报错
| Iterator<Dog>iterator= arrayList.iterator();
while (iterator.hasNext()){
Dog dog=iterator.next();
arrayList.remove(dog);
}
|
原因:使用的是容器本身的删除方法,只能修改容器的状态,但是它不能修改迭代器的状态,这导致,迭代器的状态和当前 ArrayList 的状态不相同了,而它在每次 next() 的时候会判断这个状态是否相同,就会查出 error
修正:使用迭代器本身的删除方法
| Iterator<Dog>iterator= arrayList.iterator();
while (iterator.hasNext()){
Dog dog=iterator.next();
iterator.remove();
System.out.println(dog.name);
}
|
删除应该只从容器中删除,并没抹掉内存
异常处理
菜鸟教程|Java 异常处理
比如要打开不能打开的文件,会抛出 IOException
| try {
// 可能会抛出异常的代码
} catch (IOException e) {
// 处理异常的代码
}
|
或者
| public void readFile() throws IOException {
// 可能会抛出IOException的代码
}
|
null 指向、数组越界,在运行时可能产生异常
| try {
// 可能会抛出异常的代码
} catch (NullPointerException e) {
// 处理异常的代码
}
|
05 如何管理对象
对象与引用
| Adventurer person1 = new Adventurer("1", "Bob");
|
new 为对象开辟了一个内存,person1 是对象的引用,指向对象
对象 vs 对象引用:改变 person1 的指向,导致的结果只是找不到对象,但本身仍然在内存中
状态转移容器
对象状态变化就转移到另一个容器中,根据所处的容器就走完了流程
容器与对象
容器没了,对象还在,指针也在!
层次化设计
Example不应该还管bottle
避免跨层次
层层代理
06 设计模式
面向对象设计原则:
- 对接口编程而不是对实现编程
- 优先使用对象组合而不是继承
多态 (Polymorphism)
父类定义的共性行为可由子类根据自身情况实现。例如:
| interface Animal {
void move();
}
public class Bird implements Animal {
public void move() {
System.out.println("Bird fly.");
}
}
public class Dog implements Animal {
public void move {
System.out.println("Dog run.");
}
}
|
| // client code 创建对象
List<Animal> animals = {new Bird(), new Dog()};
// 使用
for (Animal animal : animals) {
animal.move();
}
|
- Java的对象方法调用是基于对象的实际创建类型,而非对象引用的声明类型
07 输入解析
输入解析和对象创建的三种方法:
- 解析与对象构造相分离
- 硬编码方法
-
正则方法
-
解析与对象构造整体化
- 递归下降方法
正则表达式解析
- 开头和结尾:
^ 开头,$ 结尾
-
^1\d{2}, \d{2}1$
-
指定范围
[] 表示匹配范围内的字符 eg. [3-9] 匹配 3~9[^A-F] 表示匹配 A~F 之外的任意字符- 或规则
apple|banana 表示可以匹配 apple 或 banana
String 类包含 matches 方法解析正则表达式,substring() 和 indexOf() (但是复杂情况还是用 Pattern/Matcher)
贪婪匹配: 只要当前符合,就继续使用当前的规则,不会往后看。要实现非贪婪匹配: ? 匹配 0~1 次
文法
无限可枚举 (像离散)


词法 & 语法分析: 面对一个给定的字符串时,应当如何准确判断它是否符合之前所定义的变量名规范?进一步地,又该如何判定该字符串是否满足所描述的句子结构?
词法分析 Lexer
把字符串按照文法符号中的最低层级非终结符来解析,得到 Token 序列,一般可以使用 ArrayList 容器来管理
语法分析 Parser
Token 序列 \(\rightarrow\) 语法分析


语法分析就是要生成一个这样的树,节点之间的层次关系来表达非终结符之间的关系。称之为语法树 (Syntax Tree) 或抽象语法树 (Abstract Syntax Tree, AST)
递归下降
| // 表达式节点类,包含多个项
public class Expr {
private ArrayList<Term> terms;
}
// 项节点类,包含多个因子
public class Term {
private ArrayList<Factor> factors;
}
// 因子节点类,作为语法树中最基础的单元
public class Factor {
}
|
解析步骤:
- 对<表达式>按照文法规则进行拆分
- 识别出构成表达式的多个顺序相连的<项>
- 对每个<项>按照文法规则进行拆分
- 识别出构成项的顺序相连的<因子>
- 构建成一棵自顶向下的语法树

解析:

小结:

文法驱动的测试
解析与生成是互逆过程,测试的关键是生成字符串实例
08 代码风格与重构
obj.equals()
Username
设计接口:
RefundableTicket 只提供 refund 方法
BasicTicket 提供 getPrice() getSession
ExtensionalTicket 提供
Ticket 实现 RefundableTicket 和 BasicTicket
VIPTicket 实现 BasicTicket 和 ExtensionalTicket
Appendix 正则表达式
菜鸟教程|Java 正则表达式
Regex工具
regex 包
| import java.util.regex.*;
|
- Pattern 类
- Matcher 类:对输入字符串进行解释和匹配操作
| import java.util.regex.*;
class RegexExample1{
public static void main(String[] args){
String content = "I am noob " + "from runoob.com.";
String pattern = ".*runoob.*";
boolean isMatch = Pattern.matches(pattern, content);
}
}
|
捕获组
编号:从左至右计算 (
分组数目:Matcher 对象的 groupCount 方法
捕获组 group(0):代表整个表达式,不包括在 groupCount 中
| import java.util.regex.Matcher;
import java.util.regex.Pattern;
public class RegexMatches {
public static void main( String[] args ){
String line = "This order was placed for QT3000! OK?";
String pattern = "(\\D*)(\\d+)(.*)"; // "\\"
Pattern r = Pattern.compile(pattern); // 创建 Pattern 对象
Matcher m = r.matcher(line); // 创建 matcher 对象
if (m.find()) {
System.out.println(m.group(2));
}
}
}
|
Methods
| Pattern r = Pattern.compile(String regex)
|
返回一个 Pattern 对象
| Matcher m = r.matcher(String input)
|
返回 Matcher 对象
Matcher 对象有 find() matches() group() 方法
语法
\ & \\
原理:\ is an escape character, both in regular expressions and in Java strings. In regex, we need to use a double backslash (\\) because the first backslash escapes the second one in the Java string itself. 即我们要用 \\d 来表示实际的 \d
You can’t use a single backslash in a Java string because it acts as an escape character. For example, "\n" represents a newline. If you write "\d" in a Java string, it will throw an error because Java expects \ to escape the next character, but d is not a recognized escape sequence in Java strings.
捕获
保留 () 内匹配到的字符串
| 字符 |
说明 |
字符 |
说明 |
^ |
字符串开始 |
. |
除 \r\n 之外的任意字符 |
$ |
字符串结束 |
(pattern) |
匹配并捕获 |
* |
0 次及以以上 |
(?:pattern) |
匹配不捕获 |
+ |
1 次及以上 |
(?=pattern) |
待匹配的字符串后必须有 pattern |
? |
0 或 1次 |
(?!pattern) |
pattern 不能出现在待匹配的字符串后 |
{n} |
n 次 |
\b |
匹配字边界 (字的开头或结尾部分) |
{n,} |
至少 n 次 |
\B |
非字边界匹配 |
{n,m} |
至少 n 次,至多 m 次 |
\d |
数字,等价于 [0-9] |
x|y |
匹配 x 或 y |
\D |
非数字 |
[xyz] |
匹配包含的任意字符 |
\n |
换行符匹配 |
[^xyz] |
匹配未包含的任意字符 |
\f |
分页符匹配 |
[a-z] |
匹配a到z的任意小写 |
|
|
\s |
空白字符 |
\S |
非空白字符 |
\w |
[a-zA-Z0-9_] |
\W |
非单词字符 |
-
(?=pattern) : \\d+(?= dollars) will match digits only if they are followed by the word "dollars", but "dollars" won’t be part of the matched text.
-
(?!pattern) : Asserts that the specified pattern cannot be matched after the current position
-
\b : 比如 \bcat\b 能匹配单独的 cat 单词,因为两侧都有空格
-
不要在 [] {} 内加空格